Free, Easy Automations for Your Business: Introwise and Zapier
Automation has become an essential part of running an online business, whether you're just starting out, or already running a successful business. Introwise recently added no-code Zapier integrations to its all-in-one platform that are free, easy to use, and don't require from you anything extra to get started!
Zapier is a very powerful platform, but building automation with it can become very complex very quickly if the apps that you're integrating with are not designed with you, the user, in mind. That's why we spent extra time tweaking our Introwise Zapier app so it's intuitive for coaches, consultants, and solopreneurs to use and can be effective even on the Free plan.
Read on to learn more about how we achieved that and how you can leverage Introwise integrations with Zapier to start automating your business today.
A quick primer into building a Zapier automation
Zapier is a powerful tool that allows you to connect different web applications and automate workflows between them. The platform works based on a simple concept: a "Zap" is a connection between two or more apps, triggered by a specific event, and resulting in an automated action.
Here are the basic steps to build a Zap using Zapier:
To start, you'll need to sign up for a Zapier account and connect the web applications you want to use. Zapier supports more than 3,000 apps, including popular tools like Gmail, Notion, and Google Sheets. Since you're reading this, you're probably going to start with the Introwise app first.
The first step in creating a Zap is to choose a "Trigger" app and event. The Trigger is the event that starts the Zap, such as a new booking in Introwise. When the Trigger occurs, Zapier will automatically start the Zap and perform the next step.
The second step is to choose an "Action" app and event. The Action is the automated task that Zapier will perform when the Trigger occurs. For example, you could create a new task in Trello when you receive a new email in Gmail.
To pass information between Triggers and Actions in Zapier, you can use data fields. Data fields allow you to extract specific pieces of information from the Trigger and pass them along to the Action.
You can also use "Filters" to refine the Trigger and Action. Filters allow you to specify certain conditions that must be met in order for the Zap to run. For example, you could use a filter to only send an email when a booking is made for a specific service on Introwise.
Zapier is a very powerful platform, that allows building automation with no coding required. Can Introwise make it even easier?
Your automations are always on time: Instant triggers
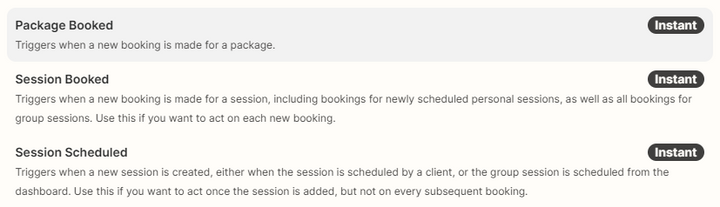
If you look at some apps available on Zapier you'll notice that some of the triggers are marked as "Scheduled" and some as "Instant".
Instant triggers run as soon as the Trigger event occurs, while Scheduled triggers run at a specific interval. That interval is only 1 minute on the most expensive Zapier plan, but goes as high as 15 minutes on the Free and Starter plans!
That means that when you're using apps with scheduled triggers your automation might happen not at all when you expect them to. This is fine for use cases when you just want to pass the data along, e.g. update your CRM, but terrible for time-specific actions, like sending reminders and notifications.
Introwise integration with Zapier uses only Instant triggers. Your automations are always on time, and run exactly when needed and not on the whim of the alarm clock on Zapier servers. This is built-in into the integration and available to you even when you're on the Free Zapier plan.
Know exactly what is being run: Built-in filters
Zapier includes a powerful way to control when automation should run: Filters. With Filters you can add simple conditions on data that was received in the Trigger and tell Zapier whether the Zap should continue with this data. E.g. you can choose to only run this automation for certain services, or when a booking contains a specific word.
Filters are a great tool, but with two major downsides. They are complex to set up and not free.
Let's address the last one first: you must be on a paid Zapier plan to use Filters. This sounds like a minor inconvenience but in practice, a lot of real-world automations require you to be exact when they should run. You probably don't want to send the same welcome email to your existing clients as you'd to the new leads that just have booked a free discovery call with you.
But maybe even more importantly: Filters are too technical! Zapier makes you define the conditions in your filters on the data fields that you receive in the trigger and use the exact values that often must be some sort of non-human-readable ID. If you're using them for something like Introwise, there will be no concept of a "booking" or a "client" in the filter: only data fields and some IDs that you'd need to pass in there.
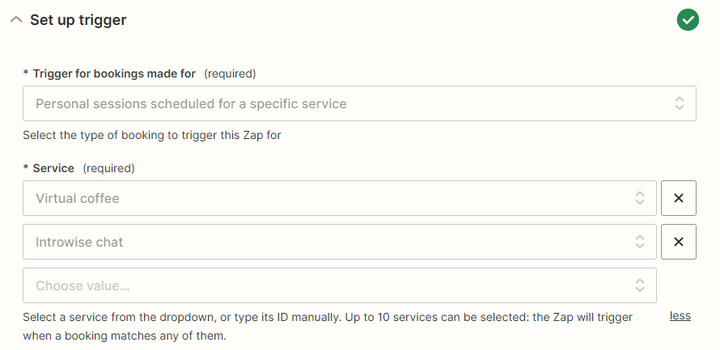
To address both of these limitations, Introwise integration with Zapier has the most popular filters built-in right into the trigger creation workflow. This makes it much more intuitive to create your automations and is available for free.
Here is an example of a built-in filter for the "Session Scheduled" trigger. You can choose when this Zap should trigger: specific services or series that are easily selectable from a dropdown. And when your business grows, and automation needs become more complex, you can always upgrade your Zapier account and use the full Filters functionality.
All the data when you need it: Rich triggers data
When a Trigger event occurs in Zapier, the automation automatically receives information from the Trigger app in the form of data fields. Data fields are pieces of information that are associated with the Trigger event and contain specific information. For example for a event about a new booking you might get its date and time, the name of the client and the message from this booking.
The data fields on trigger events are usually pretty limited for practical reasons. But what if you need some more information for your automation?
In the end, they are not built in isolation. If you're responding to a session event, you might want to know the latest bookings made for this session. Or if you're building automation for new package bookings, you might want to use some of the details about that package, such as the original title or price.
For many apps, you can use special "search" actions that allow you to fetch more information from the app and enrich your data if needed. But this requires additional configuration, becomes way more technical, and, more importantly, is a paid feature! To use search actions you'd need to build a "multi-step" Zap, which is only available from the Starter Zapier plan.
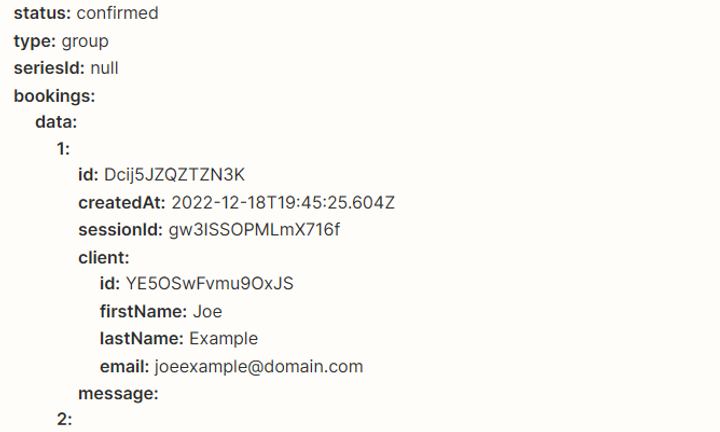
With the Introwise Zapier app, you don't need to worry about that! The trigger data fields are automatically enriched with the relevant data that might be useful for this particular trigger. So you can use it in the next action right away.
Below is an example of the trigger data for the "Session Scheduled" event that automatically includes the latest bookings information.
Use Introwise and Zapier to automate your business
How did we know that all of this is important to start building automations with Zapier? By chatting with you, our experts, of course!
So here are a few automation ideas that we've seen and that you can start building right now:
- 📑 Sync Introwise bookings with your external CRM: "Session Booked" trigger -> "HubSpot" - "Create Contact" action.
- 📧 Subscribe your new clients to your newsletter automatically: "Session Booked" trigger -> "Mailchimp" - "Add Subscriber" action.
- 👋 Send a thank you email with additional resources to your package buyers: "Package Booked" trigger -> "GMail" - "Send Email" action
- 📯 Notify your team of new bookings via Slack: "Session Booked" trigger -> "Slack" - "Send Message" action.
- 📥 Create a Trello card for each new booking: "Session Booked" trigger -> "Trello" - "Create Card" action.
- 📝 Create a new page in Notion for each booking: "Session Booked" trigger -> "Notion" - "Create a Page" action.
- 💻 Automatically add new bookings to a spreadsheet in Google Sheets: "Session Booked" trigger -> "Google Sheets" - "Add Row" action.
TLDR; create your first automation right now
With Zapier, you don't need any coding skills to create powerful automations, making it a great tool for non-technical people who want to streamline their business processes.
Once you have an idea of the workflow that you want to automate, head over to Zapier's user-friendly platform to create a Zap. Shortcut: Use this link to create an Introwise integration.
A Zap is a connection between two or more apps that automates a workflow based on a Trigger event and resulting in an Action.
To create a Zap, simply select the Trigger app and event. Zapier will fire that automation exactly on time thanks to the Introwise Instant triggers.
Use the filters that are built-in into Introwise triggers to control exactly when your automation should run.
Select the Action app and event, and map the data fields that you want to use. Introwise automatically includes the relevant data in the trigger data fields.
Test the Zap to make sure that it's working properly and set your automation live!